Viewing entries tagged
Dessert

Citrus Olive Oil Cake with a Brown Butter Glaze

Comment

Citrus Olive Oil Cake with a Brown Butter Glaze

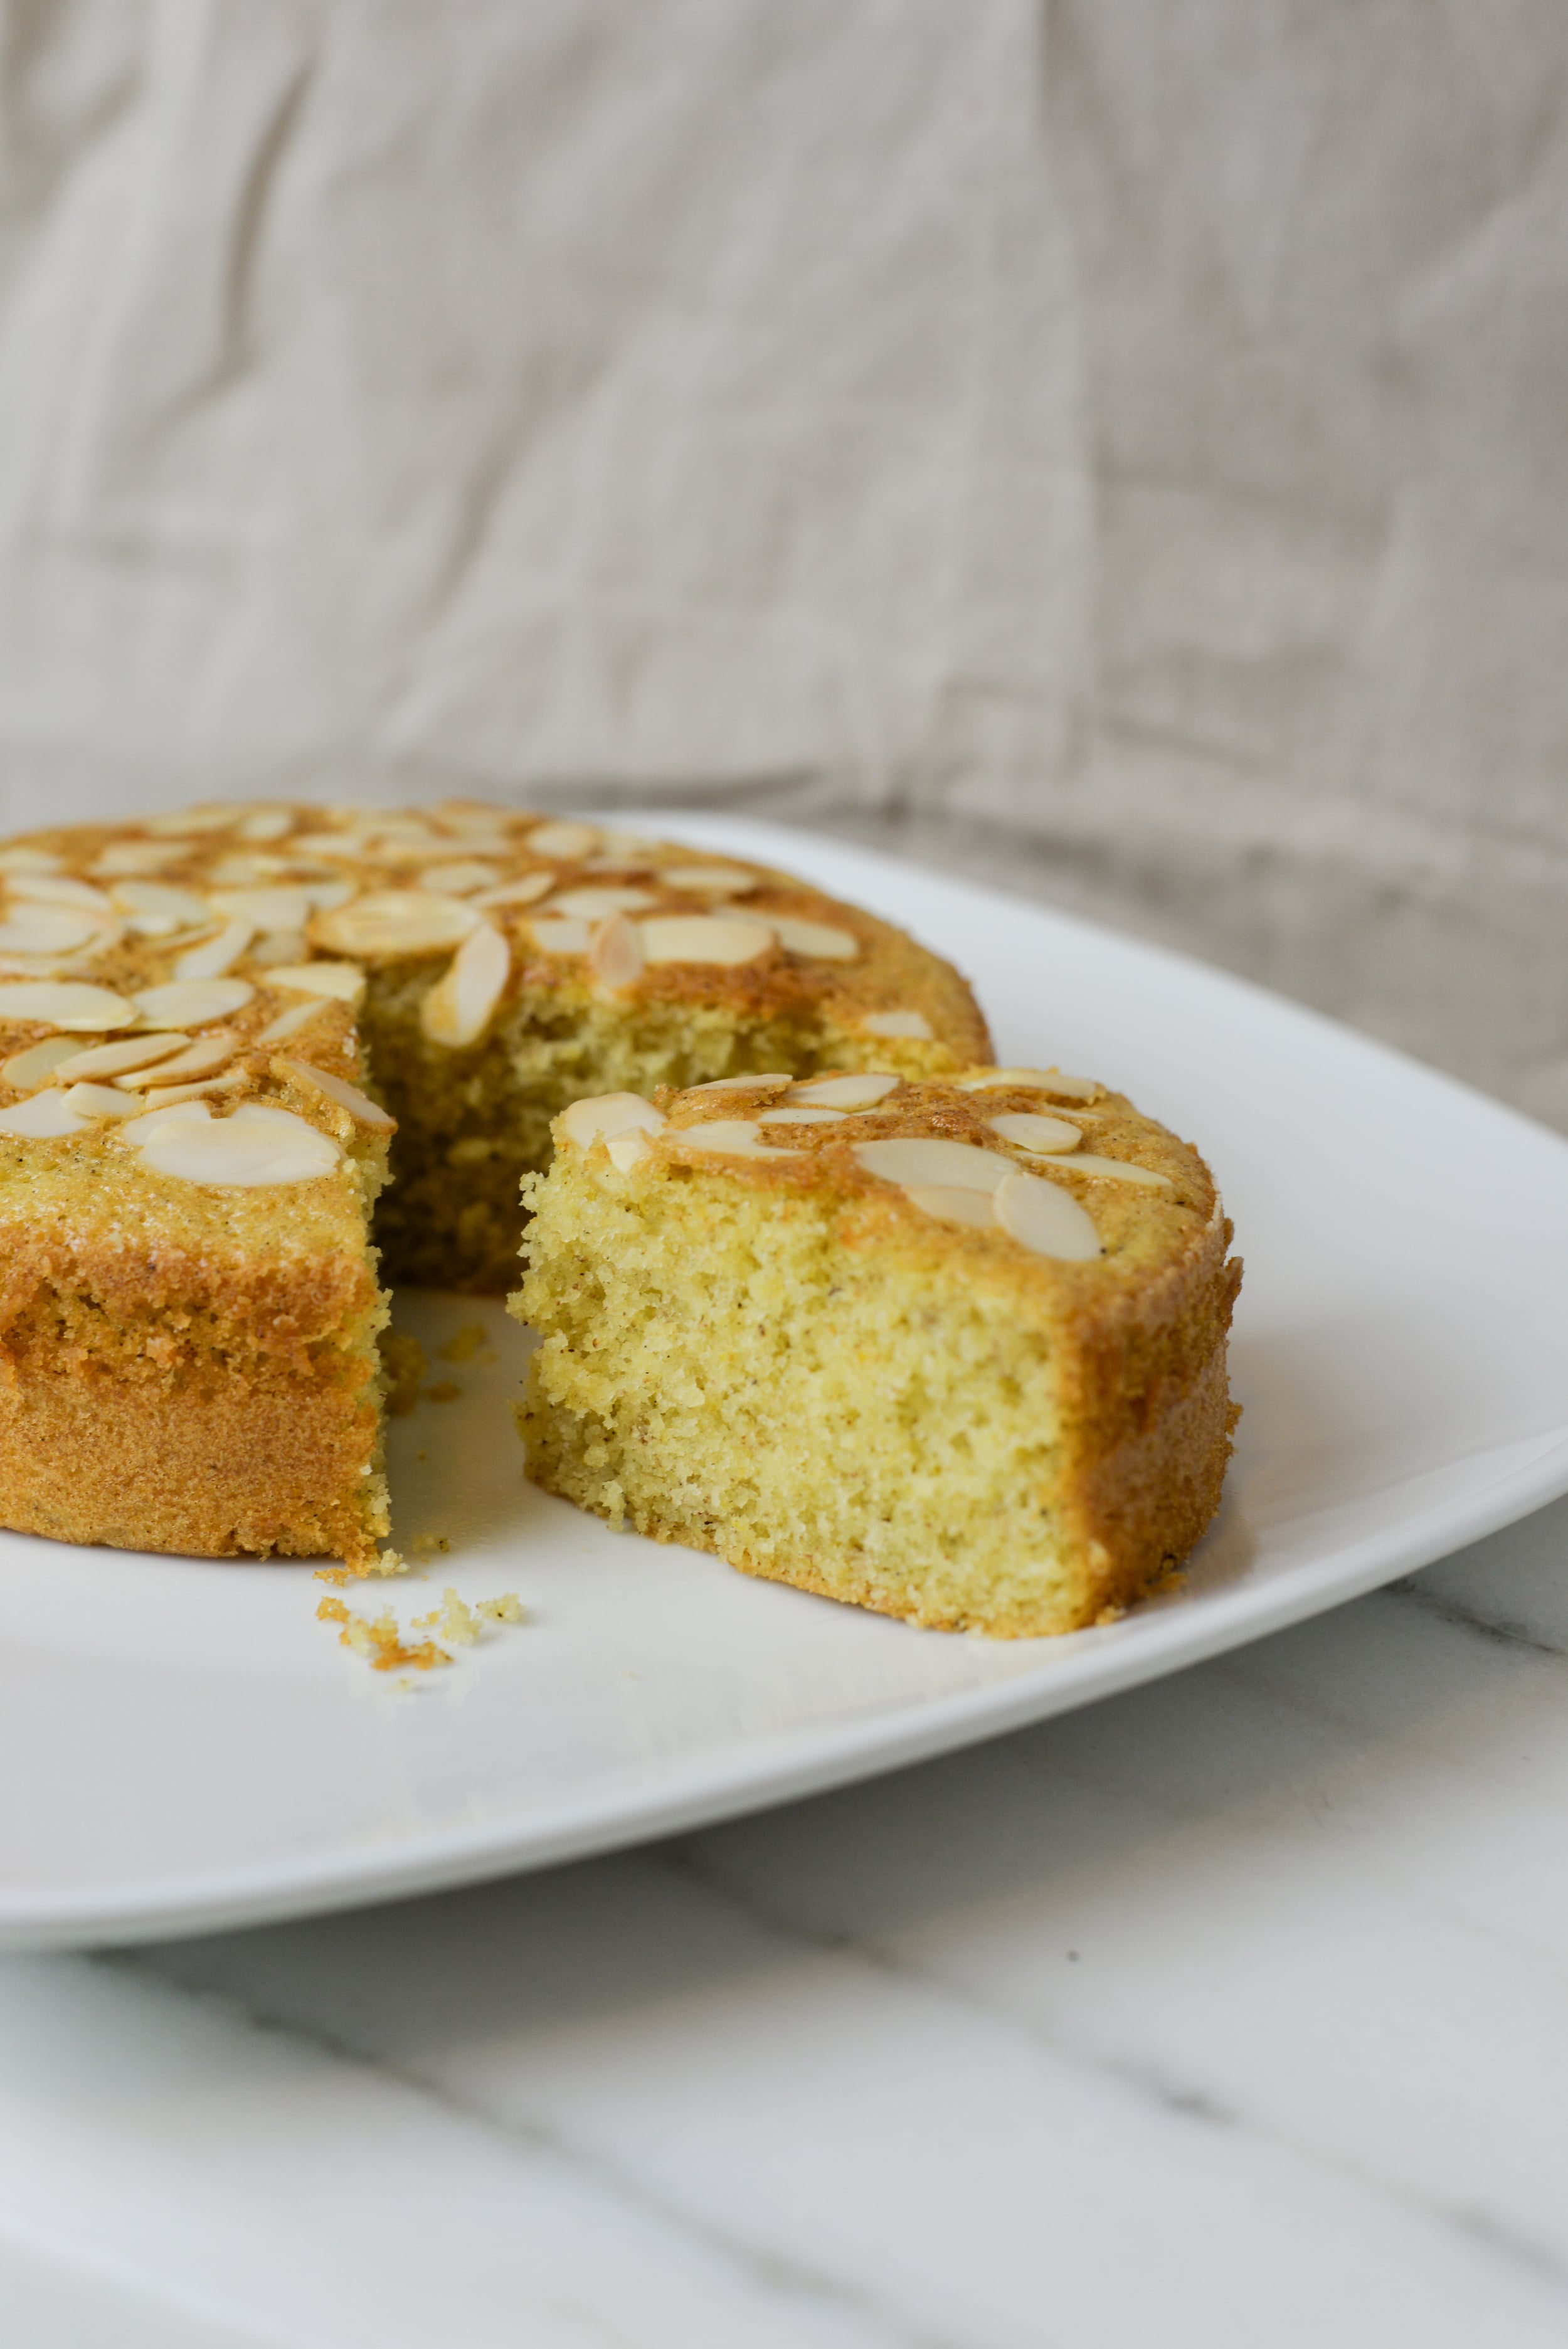
This is one of my go-to cakes for when I want to make something simple, yet also insanely delicious. Both the cake batter and the glaze come together really quickly, and the joy of a glaze is that decorating the cake is as easy as pouring the glaze over the top. Voila, you're done! There is definitely a reason I've made this cake more times that I can remember. 

There is also a reason I'm choosing to share this cake with you now... it's been a pretty crazy few months in my life and this recipe is one of my stand-bys, a tried and true great recipe. The holidays hit me harder than usual this year - with a three week trip to Michigan from Thanksgiving through mid-December, a friend of my babes' visiting from Nashville for a long weekend, followed by both of our immediate families visiting Portland for the week between Christmas and New Years. There has been a whole lot of fun, very little alone time, and only the occasional meal cooked by yours truly. 

There is still one wintery weekend at Mt Hood left on the holiday schedule (it's my birthday celebration - the ultimate holiday extender!), but then I couldn't be more excited to get back in my kitchen and back to developing fun new things for all of you! 

10710747_10100789534159085_7920830079026786476_n.jpg

Now, back to this awesome cake! It adapts easily to whatever type of citrus juice you have on hand, and don't even think about skipping out on the brown butter glaze. I've omitted it before and while the cake is still delicious, it isn't nearly the same. 

Citrus Olive Oil Cake

1 cup all purpose flour 

1/2 cup ground almonds / almond flour

1 1/2 tsp baking powder

1/4 tsp salt 

3 large eggs 

3/4 cup sugar 

1/2 cup + 1 Tbsp olive oil 

1/2 tsp vanilla 

1/4 tsp almond extract 

zest of 1 lemon or orange 

1/2 orange juice (or another citrus juice) 

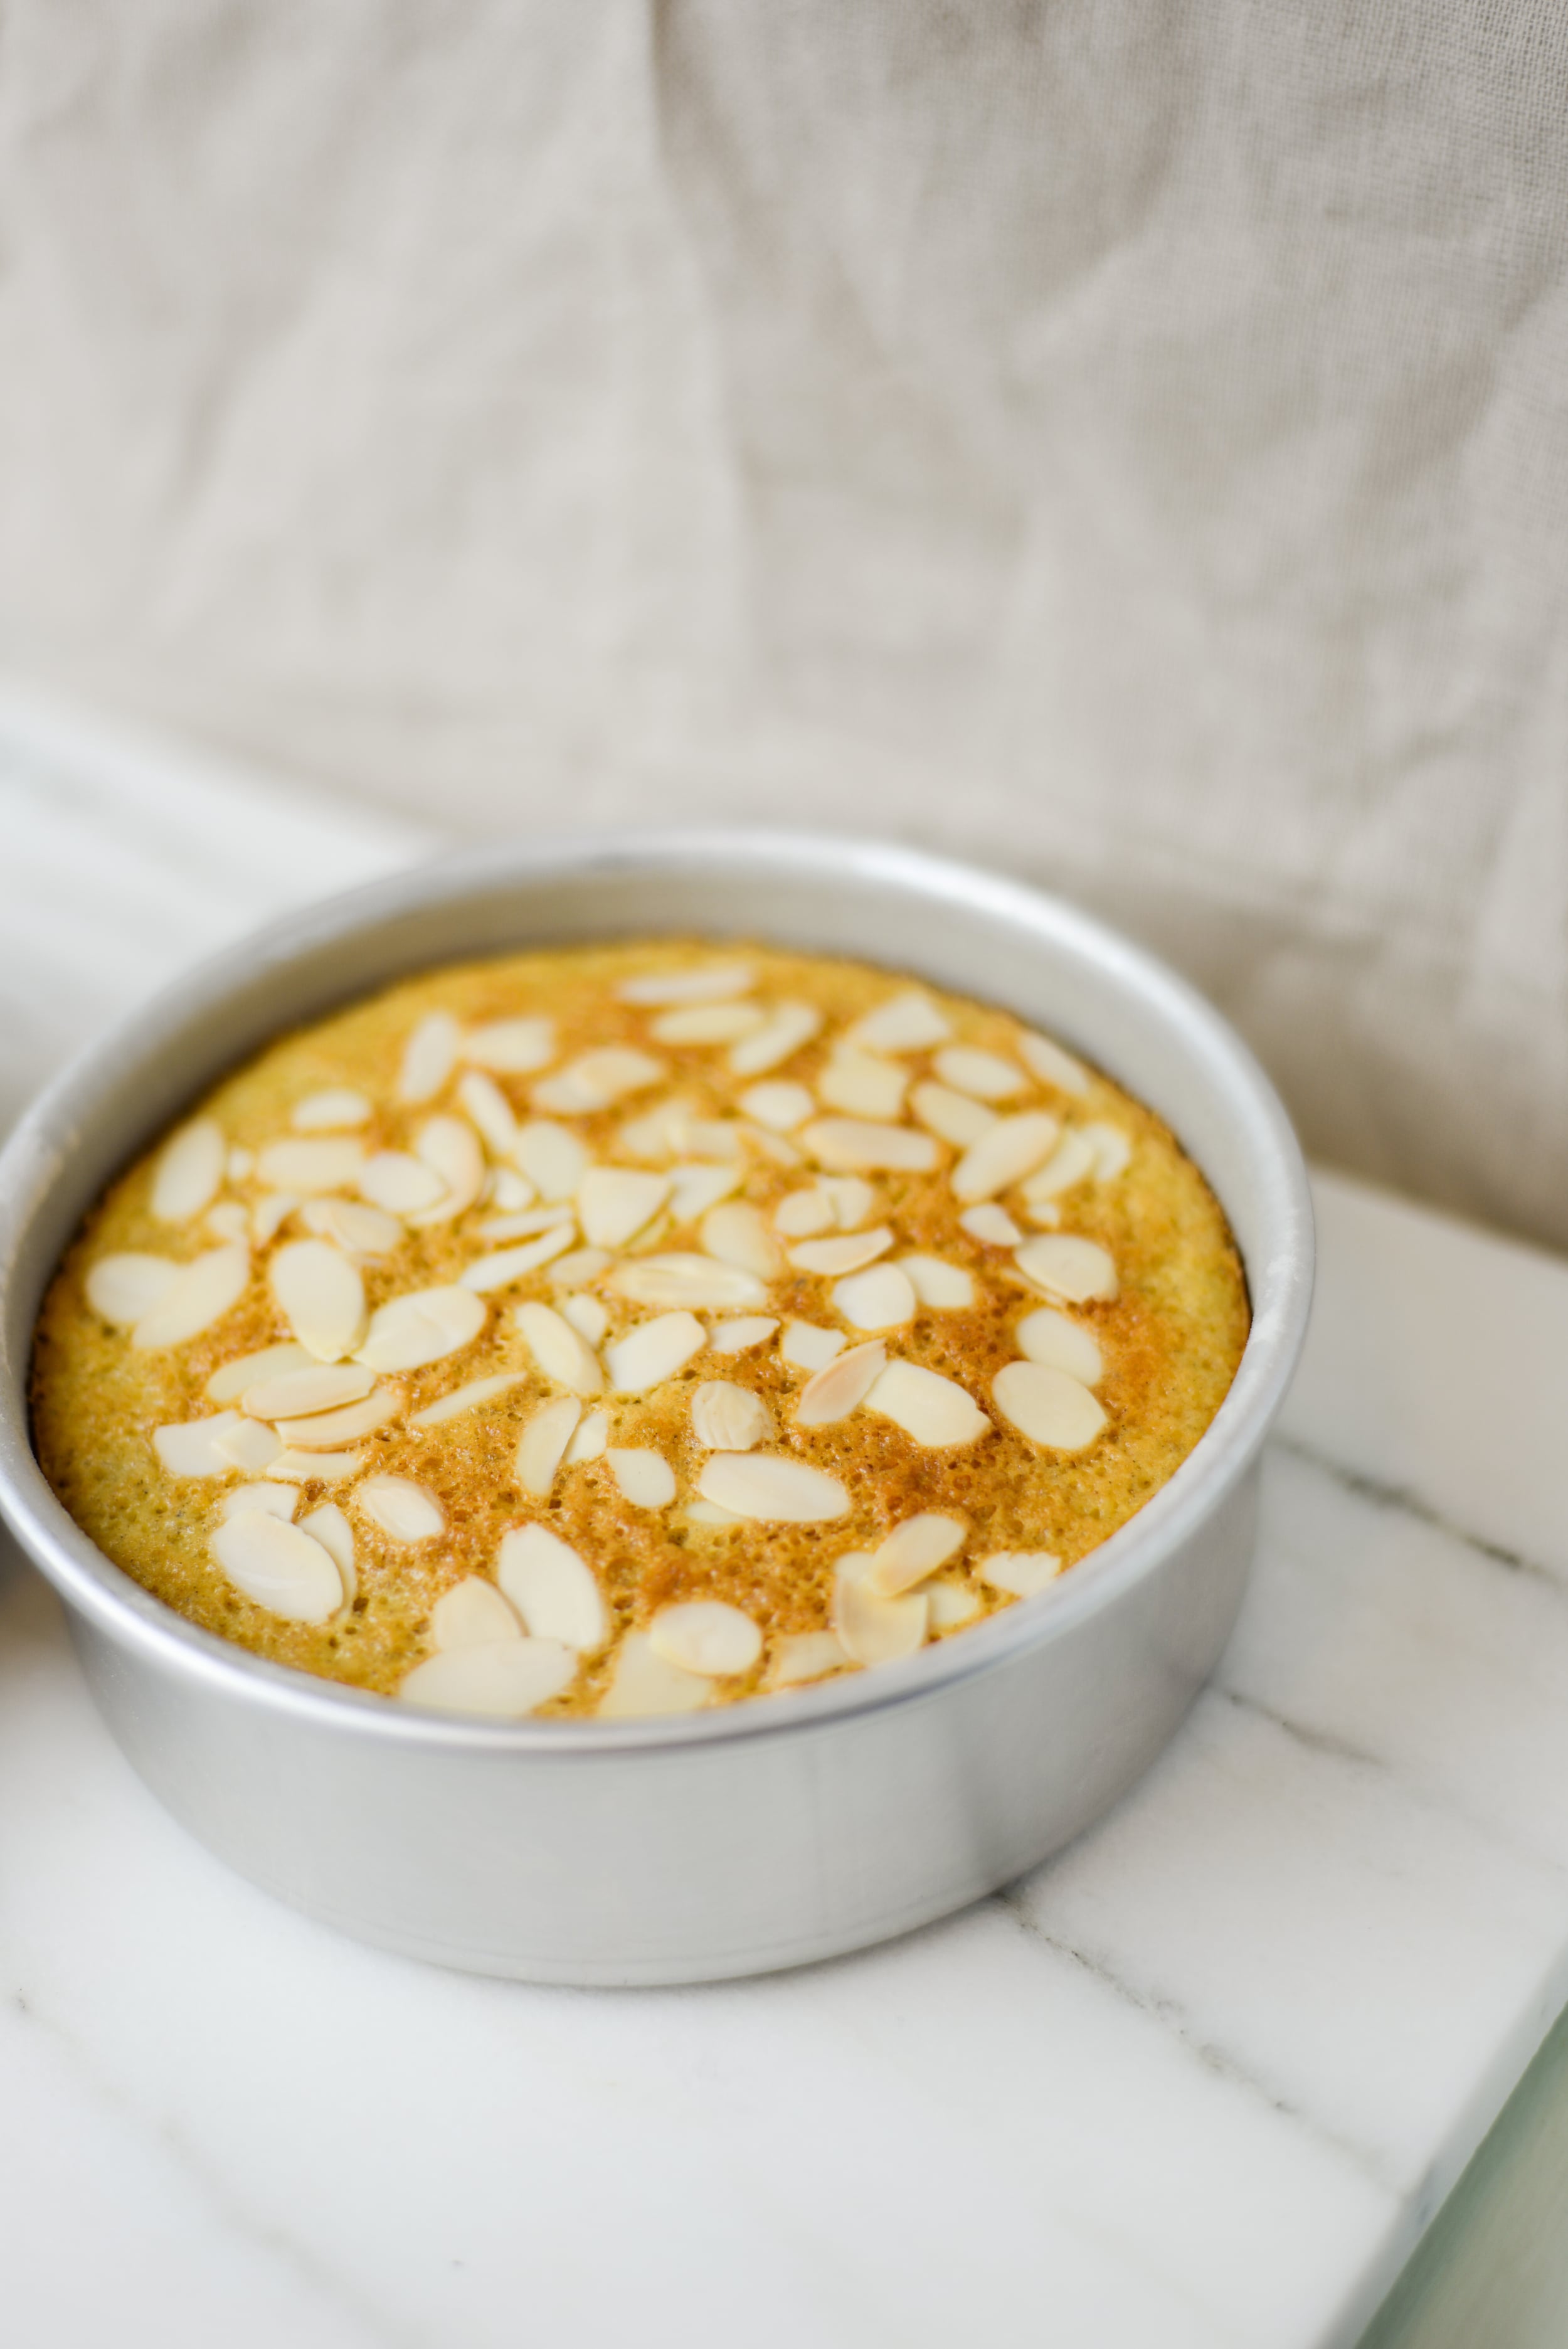
1/3 cup sliced almonds 

  • Butter and flour a 9 inch round cake pan, 8 inch square cake pan, or two 6 inch round cake pans (options are the best!). 
  • In a medium mixing bowl, whisk together the flour, ground almonds, baking powder, and salt. 
  • In a large mixing bowl, whisk eggs just a bit then add sugar and whisk until fully incorporated. Add olive oil and whisk for about 45 seconds to one minute until the mixture starts to thicken and get lighter in color. Whisk in the extracts and zest, then the juice. 
  • Add dry ingredients and whisk gently until just combined. 
  • Pour into pan (or divide equally between the two pans if you're using 6 inch), and sprinkle with sliced almonds. 
  • Bake at 350 degrees for 30-45 minutes, until a toothpick comes out clean and the top is lightly browned. 
  • Cool for 10 minutes in the pan, then gently remove and let cool completely on a rack. 

Brown Butter Glaze

2 Tbsp unsalted butter

1 cup powdered sugar

3 Tbsp whole milk

1/2 tsp lemon juice

  • Melt butter in a small pan over medium heat. Let it bubble while occasionally swirling it in the pan until it starts to turn a golden brown color and smells nutty (aka, like heaven). Remove from heat immediately to prevent it from burning. This process of browning the butter caramelizes the milk solids and gives the butter an amazing nutty flavor. 
  • In a medium bowl, whisk together the powdered sugar and milk, then slowly whisk in the butter and lemon juice. 
  • Pour over cooled cake, letting the glaze drip down the sides. 
  • Optional: decorate with long strands of citrus zest or a very thin slice of citrus! 


Comment

Gingerbread Carrot Cake with Cardamom Cream Cheese Frosting!

5 Comments

Gingerbread Carrot Cake with Cardamom Cream Cheese Frosting!

I'm going to keep this one short, folks, since I know we're all over our heads busy this time of year. And really, we should just focus on this absolutely amazing cake. We start with a hearty spiced carrot cake packed with ginger and molasses, from one of my favorite blogs - Lady and Pups. I've topped it with my favorite go-to cream cheese frosting spiked with a bit of cardamom and a variation on the ginger fries recommended in the original recipe. 

Believe me - if you love ginger as much as I do, you're going to want to start frying up ginger sprinkles on a regular basis! Absolutely genius. 

Gingerbread Cake Recipe, Cardamom Cream Cheese Frosting

This cake is really pretty darn easy to make, and it stores in the fridge over night making it an impressive and convenient holiday dessert! Packed with all the spices we crave this time of year, there really is no going wrong here. 

So, here you are! Gingerbread carrot cake, cardamom cream cheese frosting, and ginger sprinkles. All the holiday dessert you've ever dreamed! 

Gingerbread Carrot Cake 

10oz (or about 2 small) carrots, grated finely 

2 3/4 cups all-purpose flour 

1 Tbsp cocoa powder

2 1/2 tsp ground ginger 

1/2 tsp ground cinnamon

/4 tsp ground allspice 

1/4 tsp freshly grated nutmeg 

1 tsp baking powder 

1 tsp baking soda 

1/2 tsp salt 

12 Tbsp unsalted butter, melted and cooled slightly 

1 cup molasses 

3/4 cup dark brown sugar 

1/3 cup cane sugar 

1 Tbsp grated fresh ginger 

2 large eggs 

3/4 cup whole milk 

  • Prepare two 8 inch round cake pans by buttering and flouring the edges, and lining the bottom with a round of parchment paper. 
  • Toss grated carrots with flour, cocoa, ground ginger, cinnamon, allspice, nutmeg, baking powder, baking soda, and salt. Set aside. 
  • In a large bowl whisk together melted butter, molasses, sugars, fresh ginger, and eggs until smooth. 
  • Using a rubber spatula, gently fold the milk and carrot mixture into the wet ingredients. Continue folding until the mixture is just incorporated. 
  • Divide batter between two cake pans, using a spatula to smooth the batter in each pan. 
  • Bake at 350 degrees for 40-50 minutes, or until a toothpick comes out clean. Carefully run a knife around the edge of each pan to separate the cake from the walls of the pan, then let the cakes cool for about 20 minutes in the pans. 
  • Turn the cakes out of the pans and let cool completely on a cooling rack before frosting. 

Ginger Sprinkles 

3 inches fresh ginger 

3/4 cup vegetable oil 

  • Prepare a space to place your cooked ginger by setting a few layers of paper towel over a plate or baking sheet. 
  • Peel the ginger, then slice it into shoestring pieces as thin as you possible can. 
  • Combine ginger and oil in a small pan, and place over medium heat. Allow the oil to heat to a temperature where it is bubbling gently with the ginger. If the oil ever starts to smoke, be sure to turn it down! 
  • Continue cooking the ginger in the hot oil until it starts to crisp up and turn a golden brown.
  • Scoop ginger out of the oil using a slotted spoon, and place it on the paper towel to cool. Alternatively, strain oil through a fine mesh sieve into another container then place ginger on the paper towels. Either way, I definitely recommend straining your oil and saving it for later use (it'll have a nice gingery flavor!). 

Cardamom Cream Cheese Frosting 

16 oz cream cheese, softened 

3 sticks unsalted butter, softened 

1/3 cup maple syrup 

1 Tbsp vanilla 

6-7 cups powdered sugar 

3-4 Tbsp whole milk 

1/8 tsp cardamom 

  • Start by whipping the cream cheese for about 1 minute, using a stand mixer or electric hand mixer. It should start to get just a little fluffy. 
  • Add the butter and continue to whip for another minute or so, again allowing the mixture to fluff up a bit. 
  • Add syrup, vanilla, and cardamom and continue mixing until just combined. 
  • Add about 2 cups of the powdered sugar and mix until combined. Then alternate adding sugar and milk. First add about 1 cup of sugar and mix to combine, then about 1 Tbsp of milk and mix to combine. Continue this process until the frosting reaches a good consistency, or you've used all your milk and sugar. 
  • Finally, whip the frosting for about 4 minutes until it is light and fluffy. 

Assembling the Cake 

Once you have all of your pieces ready, this cake is a synch to assemble! Make sure to peel the parchment paper off of the bottom of your cakes, and take a moment to slice the top off of one cake should the tops be rounded (so they stack nicely!). 

  • If you did slice the top off one cake, use that one as your base. Set it on the plate or cake stand you intend to serve the cake on. I like to use three strips of parchment paper, about 4 inches wide to keep the plate clean. Slip them just a bit under the cake, working your way around so that the entire base of the cake has parchment between the cake and the plate. 
  • Scoop  cup or so of the frosting onto the top of the layer. There will be no shortage of frosting, so go heavy if you're a frosting lover. Smooth with an offset spatula. 
  • Set the second layer on top of the frosting, and frost the entire outside of the cake. 
  • Use the ginger sprinkles to decorate the top of the cake however you like! 

5 Comments

Star Anise Arborio Rice Pudding

2 Comments

Star Anise Arborio Rice Pudding

Rice pudding is one of my ultimate comfort foods, and standing near the warm stove with a simmering pot of creamy goodness is a favorite winter activity of mine. The incredible smell of spices filling the house is, of course, an added bonus - so lets be honest with ourselves here, there is nothing bad about making a big batch of rice pudding! 

I think a lot of my nostalgia and love for rice pudding comes from a completely non-winter experience... in fact a totally tropical one! I spent some time just after college living and working in an orphanage in the Dominican Republic, and spent every lunch and dinnertime for six months sitting at a table with a group of newly admitted young boys. During these moments around the table, we ate simple Dominican classics and the boys were on their best behavior (a much needed moment of quiet in an otherwise rambunctious place!). One of those classic dishes was arroz con leche - a simple and hardly sweet version of rice pudding. Whole allspice berries and cloves were carefully set to the side of the plate as we ate our way through. 

While very few would consider a full plate of rice pudding a balanced dinner, I can't help but justify it on occasion thinking back to those meals with my house-full of sweet Dominican kids. It kept me going then, and it'll keep me going now! That said... rice pudding is much more often eaten in my house as a simple dessert or an afternoon snack these days. 

Rice Pudding Arborio Rice Star Anise Recipe

This rice pudding is made with arborio rice, which is the short grain Italian rice used to make risotto. This rice is particularly starchy, so it creates an amazing thick rice pudding if you cook it down long enough. I love how elegantly it can be served as it holds it's shape so well. Cook it a little less, and you'll have a creamier, thinner pudding! 

Rice pudding in my house is most often an indian inspired affair, cooked with whole vanilla bean and cardamom -- but I wanted to mix things up with this recipe and use what has become one of my favorite spices right now. Star anise has such a rich and distinctive flavor, it makes a perfect alternative to my traditional cardamom. Plus it is just so gosh darn pretty! 

I love the simplicity of making rice pudding, and I think that you will too! 

ingredients: 

3/4 cup arborio rice 

6 cups whole milk 

1/2 cup cane sugar 

1 vanilla bean, scraped (or 1 tsp vanilla extract) 

5 whole star anise stars 

instructions: 

  • Place all ingredients in a medium saucepan, and place over medium-high heat. If you're using the vanilla extract as opposed to vanilla bean, save that to add later. 
  • Bring to a gentle simmer, then turn the heat down to about medium. You don't want it to boil, just to continue simmering very gently. 
  • Cook the mixture for about 40 minutes, stirring occasionally at the beginning and more frequently as it starts to thicken to prevent it from sticking or burning. 
  • Remove the pan from heat when it's reached your desired consistency. As you can see from the photos, I cooked mine to be very thick - this is the rice pudding I was in the mood for. You can just as easily stop the cooking a bit earlier and have a thinner pudding! Just remember that it will thicken as it cools. 
  • If you're using vanilla extract, stir it in when you remove the pan from the heat. 

2 Comments