Espresso Brownie Hearts with Hazelnuts & Sea Salt

Comment

Espresso Brownie Hearts with Hazelnuts & Sea Salt

Let's be real, guys. Brownies make everything amazing. Dense. Fudgy, Chocolatey. Happiness. I hadn't made brownies in quite some time, so they seemed like the perfect treat for Valentine's Day this year. Plus, when you take a heart shaped cookie cutter to brownies, they instantly become festive! 

I added a hefty serving of super finely ground coffee to the batter and topped these beauties with some chopped hazelnuts and a little flake salt. With a scoop of vanilla ice cream, it's basically pure heaven! 

So here's a little something to make and share with your loved ones this Valentine's / Galentine's Day. I promise, nobody is going to be upset when you show up with brownies. And the best thing about cutting them into hearts is all the little scrap pieces you get to devour in the process! 

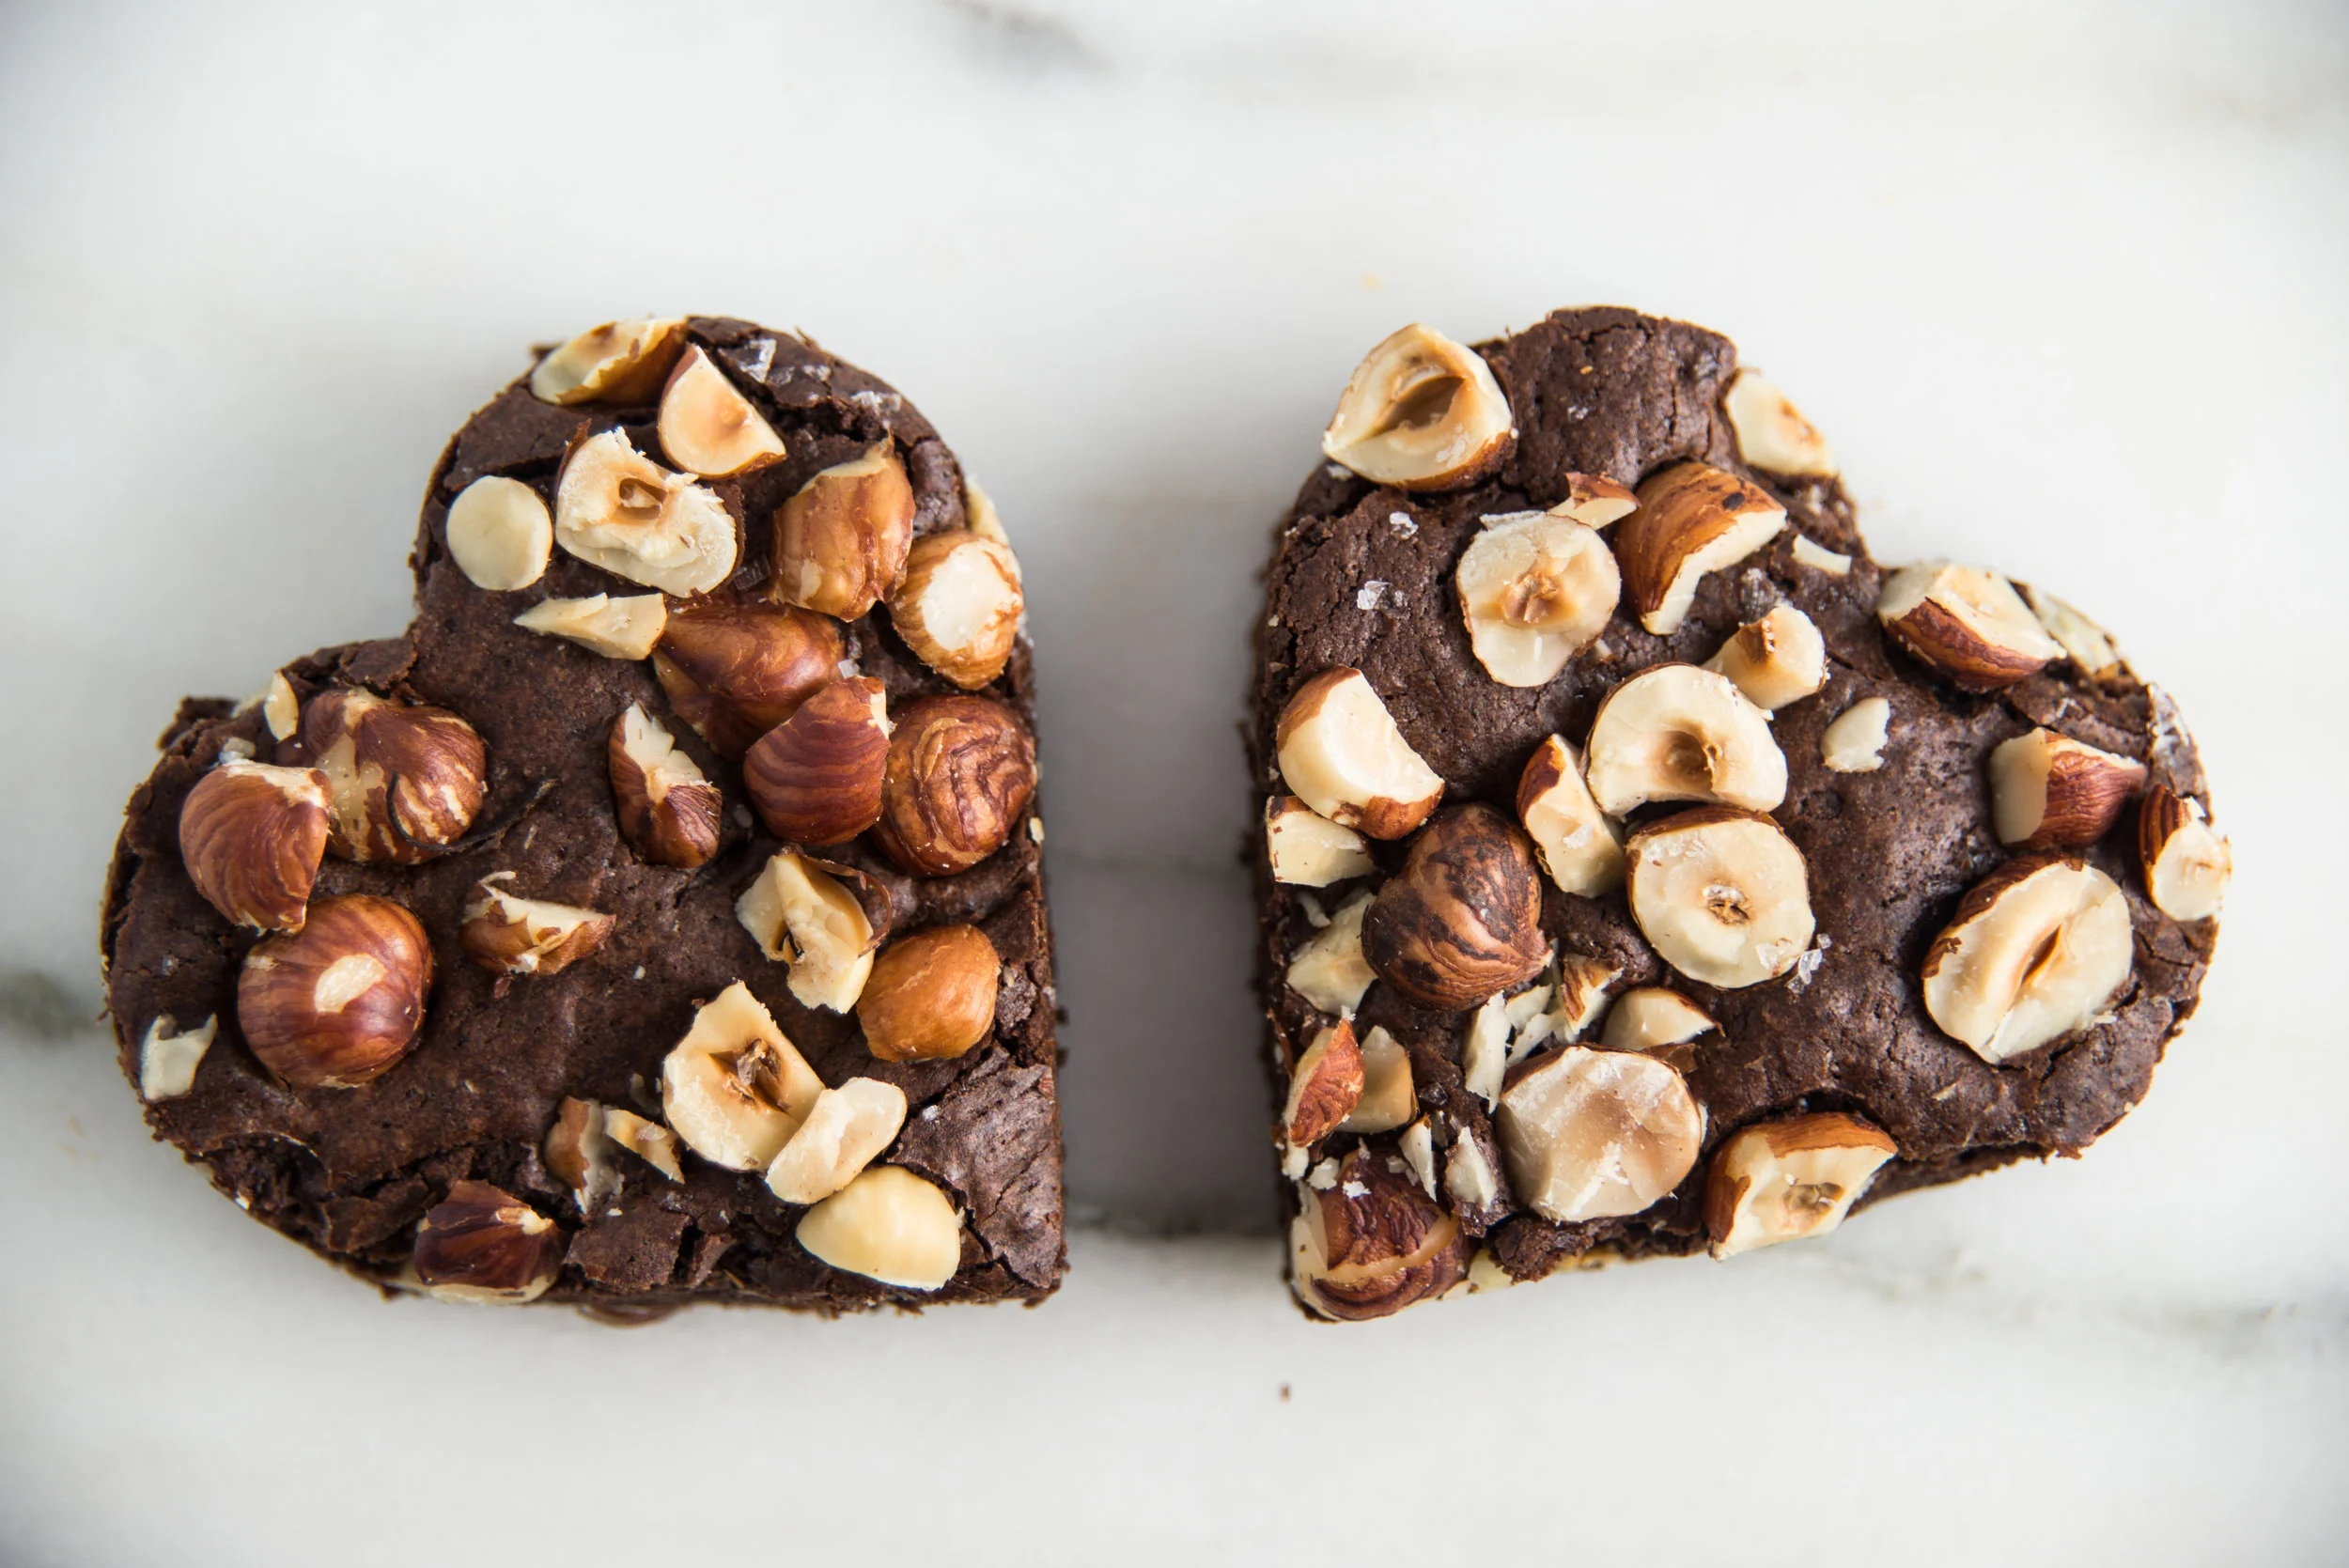
I started with my classic brownie recipe, which to me is the perfect balance between fudgy and cakey. They're mostly fudgy, but with the slightest bit of lift so they're not too rich. Then I just added in some super finely ground coffee (okay, a lot of it) and sprinkled hazelnuts and flake salt on top. Dressing up brownies is easy, and oh so satisfying! 

Plate one of these beautiful hearts with a scoop of vanilla ice cream and a dash of cocoa powder to treat yourself to a decadent treat - Hello Valentine's Day! 

Espresso Brownies with Hazelnuts & Sea Salt

Notes: I listed a range of coffee to add to these brownies, because everyone has a different preference. I love them with the full 3 Tbsp, rich and roasty, but use a smaller amount if you aren't coffee obsessed. 

3oz unsweetened chocolate 

4oz semi-sweet chocolate (about 60% cacao is great!)

4oz unsalted butter 

1 1/4 cup sugar 

2 tsp vanilla extract 

3 eggs

1 cup flour 

3 Tbsp cocoa powder 

1/2 tsp salt 

1-3 Tbsp very finely ground coffee or espresso

3/4 cups roughly chopped hazelnuts

flake salt to garnish  

  • Prepare a quarter sheet pan (or an 8x8 or 9x9 pan) by making a parchment paper sling, covering the bottom and coming up two of the sides with a little extra so you can lift the brownies out of the pan. Cover the parchment with oil, using spray or a brush. 
  • In a double boiler (or a bowl over a pot with a little water in the bottom!), melt the chocolate and the butter together, stirring occasionally. 
  • While the chocolate is melting, measure out the rest of the ingredients. Put the sugar and vanilla in one bowl, and the flour, cocoa powder, salt, and espresso in another bowl. 
  • Once the chocolate is melted, pour it into the bowl of a stand mixer with the paddle attachment (or use the bowl it's already in and a whisk!). Add the sugar and vanilla to the chocolate and mix on a medium-high speed until the sugar starts to dissolve and the mixture gets shiny.
  • Add the eggs and mix until combined. 
  • Add the flour mixture and use a spatula to stir it into the chocolate until just combined. 
  • Pour the mixture into the prepared pan and spread it out as evenly as you possibly can. Sprinkle the hazelnuts and a little flake salt on top.  
  • Bake at 375 degrees for 20-25 minutes (longer if you used an 8x8!), until a toothpick comes out of the center clean. 
  • Let the brownies cool completely in the pan, then lift them out and set them on the counter or a cutting board. Use a heart shaped cookie cutter to cut the brownies into hearts. 
  • Store in an airtight container in the refrigerator. 

Comment

Almond Raspberry Bakewell Tart

Comment

Almond Raspberry Bakewell Tart

Years and years ago, my parents were staying at a small Bed and Breakfast in England when they were served this classic English tart. My dear mother is not one to love sweet things at breakfast but she absolutely fell in love with this delightful almondy raspberryy tart! So much so that she actually asked for the recipe (much to my appreciation!). The recipe looked a lot like the jotted down notes I tend to make in my trusty notebook while I'm putting something together. A list of ingredients separated by quick notes, with no real instruction on how the ingredients are supposed to come together. It's the nightmare of many, but feels right at home in my little world. 

So, ages ago, my mom first tackled the recipe to serve as a Christmas morning treat and it became an instant classic. While I hardly ever make this dish, it is definitely my favorite addition to a filling brunch and the perfect answer to a slow morning with nothing more than a cup of coffee and a little sweet treat. 

All that said, this is definitely not just a breakfast tart - it's sure to be a showstopper served as actual dessert as well... it just never seems to last that long around here! 

Making the crust can start with a pastry cutter, but generally needs to end with your hands in the bowl, pressing the flour and butter together into a beautifully tender pastry. 

I have to say here, getting my hands into a bowl of flour, no matter how small or how large, always brings a serious dose of joy into my world. Things have been pretty darn scary out there in our country these past few weeks (okay months, if we're being honest). I'm doing everything I can to fight back against intolerance, but that incredible pressure also means it is endlessly important to find time for self care. And my self care comes in the form of baked goods. Lots and lots of baked goods! 

Once that crust is ready, we press it into the pan, brown it nicely, then coat it with a nice layer of raspberry jam. It's a classic combination, but one can never really go wrong when it comes to mixing the flavors of raspberry and almond. Pure heaven every time. 

Then, of course, we have the filling. An almond frangipane packed with eggs, almond flour, and both vanilla and almond extract from my friends over at Sonoma Syrup Co.. High quality extracts make all the difference when it comes to flavor, especially making something with simple ingredients like this tart. I've sung the praises of their vanilla "crush" over and over again, and their almond extract is just as good - perfectly balanced and packed with flavor! 

Here we have it! The gorgeous tart in all of it's glory! I highly recommend this one for any occasion that calls for something sweet - a special brunch, a quiet breakfast at home, dessert with friends and family, or any old Tuesday that calls for a little pick-me-up. 

Get baking, friends! 

Bakewell Tart 

Notes: You'll notice all the measurements are by weight, which I don't normally do here. Weighing your ingredients really is the best way to accurately make a recipe, and these amounts don't divide out to clean measurements so I decided to leave them. If you need, there are plenty of charts online to convert the weights into measurements. The filling calls for ground almonds - this is as simple as putting almonds into your blender or food processor and grinding until fine. Don't go too far, or you'll get almond butter! 

crust: 

175g white flour 

38g semolina flour 

25g sugar (preferably caster sugar)

1/4 tsp baking powder 

pinch salt 

150g cold butter, cubed

filling: 

3 eggs 

2 egg yolks

100g ground almonds or almond flour

90g sugar

1 tsp almond extract 

2 tsp vanilla extract 

raspberry jam

  • Prepare a tart pan or springform pan by cutting a circle of parchment paper to line the bottom and buttering the sides of the pan. 
  • We'll start with the crust, of course. Sift or whisk together all the dry ingredients (flour, semolina, sugar, baking powder, salt) in a medium bowl. Add the butter and start to cut it in with a pastry cutter. Eventually, you'll want to use your fingers to quickly press the flour and butter together. It will be a little crumbly, but it'll be just fine! You just need it mixed enough that it holds together when squeezed. 
  • Pour the crust mixture into your prepared pan, and gently press it into place. I like to just cover the bottom of the pan, but you can also cover the sides if you wish. Place the pan on a baking sheet to more easily move it in and out of the oven. 
  • Bake the crust at 375 for 12-18 minutes, until it is just lightly golden brown. 
  • While the crust is baking, get the filling ready. In a medium bowl, whisk together eggs, egg yolks, ground almonds, sugar, and extracts. 
  • When the crust is ready, pull it from the oven and gently spread a layer of raspberry jam over the crust. You can go thin or thick - it's up to you! Then give the filling one last whisk and pour it over the top. 
  • Return the tart to the oven and bake for about 25 minutes, until the top is golden brown. 
  • Sprinkle with powdered sugar to serve if you wish! 


Disclaimer: I have received free product or money from businesses highlighted in this article - which helps me keep this blog alive. I take great pride in the advice I share here on Toot Sweet, and would never recommend a product to you that I'm not over-the-moon excited about, or that I wouldn't purchase for use in my own kitchen. 

Comment

Cranberry Orange Vanilla Sour Jellies

1 Comment

Cranberry Orange Vanilla Sour Jellies

I've been dreaming about making jellies for quite some time now, with the lack of a mold being the big thing holding me back. With one last bottle of Starvation Alley Farms cranberry juice in my fridge and the citrus section at the grocery store bringing all sorts of joy to my world, I knew it was high time to get my act together and get some molds. Enter these treats: the army of sour gummy bears here to pucker your mouth and put a smile on your face. 

Making jellies is basically making jello, but with a little extra gelatin to give them a denser texture. These aren't full-on gummy bears, but they satisfy the same cravings in my life (and with none of the sugar!). 100% cranberry juice brings a hefty dose of tart flavor to the mix, tamed with a bit of orange juice and vanilla. I'm really excited to eat these as a tart treat, but if you're looking for a little less of a pucker, do add a tablespoon or two of sugar to sweeten things up a bit. If you're feeling fancy, you can also coat the final product in superfine baker's sugar... then you basically have sour patch kids! 

I used cara cara orange juice for my jellies, which is without a doubt my favorite variety of orange - the perfect balance of sweet and flavorful and the most cheerful color. They're just plain the best. Don't even try to argue : ) 

And thankfully, setting up a few photos means I get one orange to eat and one to juice for the actual recipe. 

Making jellies like this may seem like a big project - but hear me out! It literally takes 15 minutes (at the very most!) to prep these treats. Then you just let them cool for a few hours and pop them out of their molds - it's SO easy, just about anyone could find the time. 

Plus, you can feel good about devouring as many as you want, because they're just juice and gelatin - and cranberry juice is absolutely packed with goodness. Need I say more? 

In addition to cara cara oranges, I used two of my favorite pantry staples in these treats. Cranberry juice from the fine folks over at Starvation Alley Farms is grown on cranberry farms here in the PNW that are transitioning to organic. It's the perfect ingredient for drinks, my cranberry curd, and treats like these. I also included my favorite vanilla extract from my friends over at Sonoma Syrup. Their Vanilla Bean Crush is a high quality vanilla extract with flecks of vanilla bean right in the extract. I'm in love with vanilla and this one takes it to the next level. 

Cranberry Orange Vanilla Jellies

Notes: You can make this recipe without a mold and cut the jellies into little squares. I love a tart treat sometimes, but if you want to take the edge off a bit and sweeten these up, feel free to add the optional sugar addition. 

1/2 cup 100% cranberry juice 

1/4 cup fresh squeezed orange juice (cara cara are my favorites!) 

1/2 tsp vanilla extract

2 Tbsp / 2 pkg unflavored gelatin

1-2 Tbsp sugar or honey (optional) 

  • Combine juices and vanilla in a small saucepan, then sprinkle the gelatin over the top. Let it sit for a few minutes so the gelatin can bloom. The gelatin will be wet and the top of the liquid a little wrinkly when it's ready. 
  • While you wait, lightly coat either silicone molds or a bread pan with oil and set aside. 
  • When the gelatin has bloomed, stir in the sugar or honey if you're opting to use it. Over medium-low heat, warm the mixture gently until the gelatin and sugar have dissolved completely. 
  • Fill your molds or pour the mixture into the prepared bread pan. 
  • Refrigerate for at least a few hours, then remove from molds. If you used a pan, use a rubber spatula or knife to gently loosen the jelly and tip it out onto a cutting board. Cut into squares or shapes. 
  • Store in an airtight container in the refrigerator. 

1 Comment